This feature is developed specifically for those circumstances where the start times of lessons fluctuate strongly every day, usually because of the tide. The same surfing lesson, for instance, would be given on Monday at 11.00 but Tuesday at 11.45, etc., because of the change in tide time. Now you can, similar to the 'instructor availability' schedule, select per timeslot if there will be availability for a given product.
To start working with tide-based slots and the availability schedule:
1. Enable the use of the 'Availability Schedule' in the product settings
For every existing product that you want to schedule in this way, go to 'Products --> Select product --> enable Use Product Availability Schedule'. You can also create a new product and enable this setting. Set up the product(s) as you normally would.
Notes:
- If you create a new product, make sure to also add this product to your instructors teachable products under 'Users --> Instructor --> Edit --> Instructor products'.
- For clarity, we recommend that you use the 'Internal name' field to reflect that this product uses the Availability Schedule, so our example name is 'Surfing lesson - tide based'. This is only an internal name, your customers will see the regular product name in the booking form.
2. Adjust your timeslots
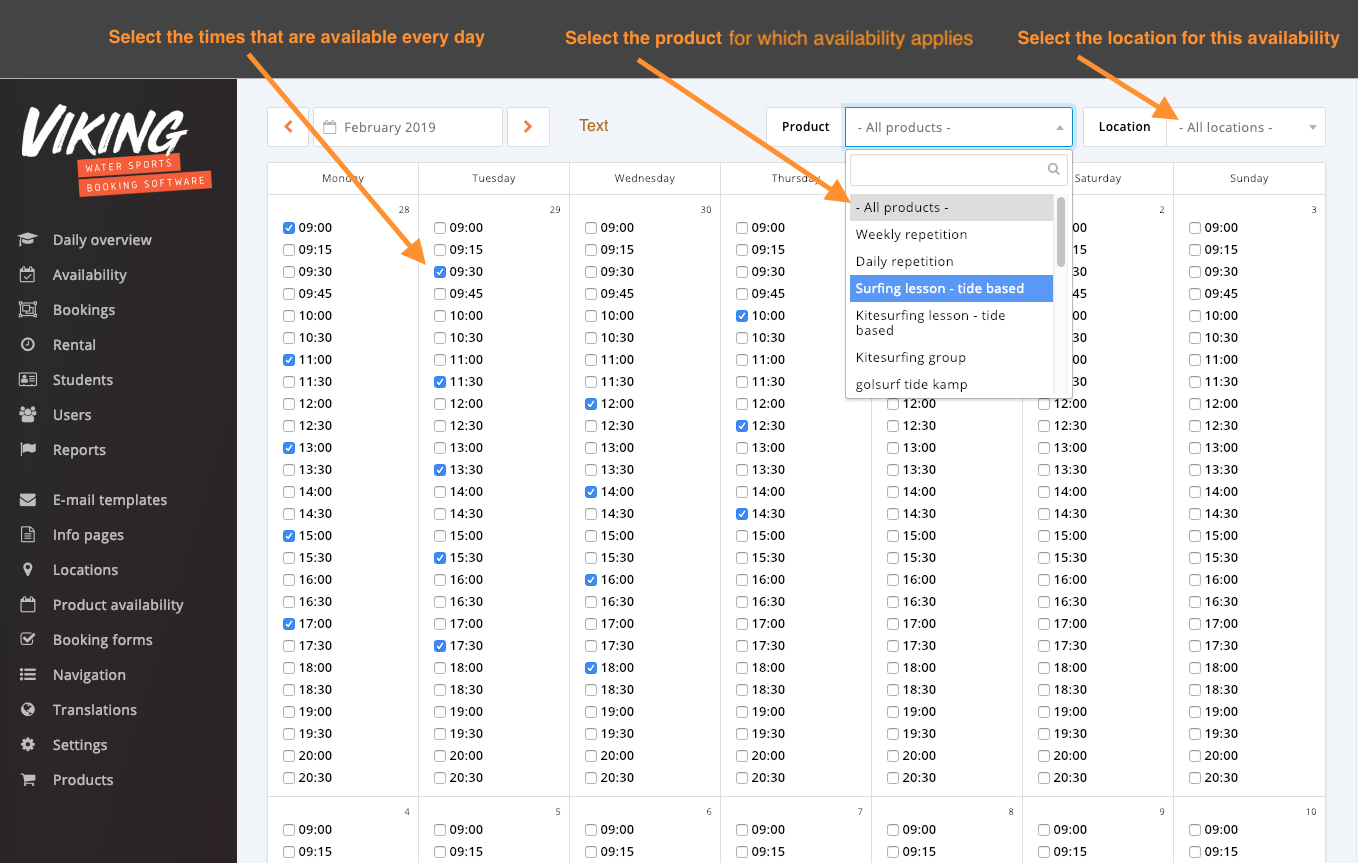
Take a look at the screenshot below, you see that many different timeslots can be selected. All of these have to be added (once) to your system settings. Go to 'Settings > Planning' and add any times that you want to use.
So take a moment to think about which times you will actually need for a tide-based setup. Often, 30-minute intervals (or longer) can suffice. Add (and order) the new timeslots and click Save.
Notes:
- If you add many timeslots, these will also become available for existing products that do not use the Availability Scheduler. Make sure to double check your normal Availability Rules. For products that had availability rules set to 'all timeslots', you will now have to make a selection, otherwise all your added times will also be shown in the calendar on the booking form.
3. Add a normal 'Availability Rule' for the product(s)
Under 'Product availability --> Availability Rules', create a new rule that includes your new product(s) (if using an existing product, check if it's availability rule is correct). We suggest also adding a date range.
You can already set some filters here, for instance select only weekdays. In that case, you will also only be able to select weekdays in the availability scheduler.
When everything looks good, click Save.
4. Set the times in the 'Availability Schedule'
Now go to the 'Availability Schedule' tab. You get to see one big table of all your time slots.
You can now set the availability for all (tide-based) products at once, or per product and/or location. Go through the calendar and select which timeslots are available every day. Also do this for the upcoming month(s), etc.
Notes:
- Changing the availability for ALL products, overwrites the availability (or lack thereof) that has previously been set for a specific product or location.
- Changing the availability for a specific product, overwrites what has been previously set for -all products-. So effectively, your latest settings are always valid.
- Days/times that are not available according to the normal Availability Rules cannot be selected in the Availability Calendar.
5. Test if everything works as planned
Go to your booking form and try to make a test booking as a client, to see if the correct times show up on every day. You can also use the 'Availability Tester' tab to inspect why certain slots are or aren't available.